Quick Start
Welcome
from flask import Flask
from flask_restaction import Api

app = Flask(__name__)
api = Api(app)

class Welcome:

    def __init__(self, name):
        self.name = name
        self.message = "Hello %s, Welcome to flask-restaction!" % name

# create a resource
class Hello:
    """Hello world"""

    # create an action
    def get(self, name):
        """
        Get welcome message

        $input:
            name?str&default="world": Your name
        $output:
            message?str: Welcome message
        """
        return Welcome(name)

api.add_resource(Hello)
# config route of API document
app.route('/')(api.meta_view)

if __name__ == '__main__':
    app.run(debug=True)
Save as hello.py, then run it:
$ python hello.py
 * Running on http://127.0.0.1:5000/
 * Restarting with reloader
Visit http://127.0.0.1:5000/hello:
{
  "message": "Hello world, Welcome to flask-restaction!"
}
Visit http://127.0.0.1:5000/hello?name=kk
you will see:
{
  "message": "Hello kk, Welcome to flask-restaction!"
}
Visit http://127.0.0.1:5000 for generated API document.
Two concept
- resource
- eg: class Hello, represent a kind of resource
- action
- eg: get, post, delete, get_list, post_login. HTTP method + '_' + anything is OK.
Validation and Serialization
Use $shared to describe shared schema in doc string and register it via
Api(docs=__doc__) .
Use $shared in resource's doc string to describe shared schema for resource.
In action's doc string, use $input, $output to describe request and response
data struct, use $error to describe exceptions.
- $input
- Request data struct, if no $input, then won't validate request data and call action without params. If HTTP method is GET,DELETE, request data is query string. If HTTP method is POST,PUT,PATCH, request data is request body, and Content-Type should be application/json.
- $output
- Response data struce, if no $output, then won't validate and serialize returns value of action.
- $error
-
Describe exceptions, only used for API document, eg:
$error:
    400.InvalidData: invalid request data
    403.PermissionDeny: permission deny
Syntax is: status.Error: message
If request data validation fail, then response is:
{
    "status": 400,
    "error": "InvalidData",
    "message": "xxx xxxx"
}
If response data validation fail, then response is:
{
    "status": 500,
    "error": "ServerError",
    "message": "xxx xxxx"
}
Schema is YAML text, see Schema.
Custom validator
Validr's document had describe custom validator, see Validr.
All custom validators is registered via Api(validators=validators).
Add resource
Use Api.add_resource to add resource, params of add_resource will
be passed to resource's __init__ method.
URL is the same as resource name, if you want to use another URL, you can create a new resource like this:
api.add_resource(type('NewName', (MyResource,), {}))
URL rules
use url_for(endpoint) of flask to build url for action.
endpoint is resource@action_name
- resource
- resource classname in lowercase
- action_name
- the last part of action(split via '_')
Usage:
url_for("resource@action_name") -> /resource/action_name
Example:
url_for("hello") -> /hello
url_for("hello@login") -> /hello/login
Response errors
from flask_restaction import abort

# function prototype
abort(code, error=None, message=None)
If param error is None, the effect is the same as flask.abort(code).
If error is instance of flask.Response, the effect is the same as flask.abort(code, error).
Otherwise, response:
{
    "status": code,
    "error": error,
    "message": message
}
The response data will be serialized to appropriate format.
Permission control
The authorization implement is for convenient in many projects which didn't need too flex permission system. You can use flask-login and others, they works well with flask-restaction.
Let's begin with a example
meta.json, config roles
{
    "$roles": {
        "admin": {
            "hello": ["get", "post"],
            "user": ["post"]
        },
        "guest": {
            "user": ["post"]
        }
    }
}
init.py, decide role according to token
from flask_restaction import Api, TokenAuth

api = Api(metafile='meta.json')
auth = TokenAuth(api)

@auth.get_role
def get_role(token):
    if token:
        return token["role"]
    else:
        return "guest"
hello.py, business logic
class Hello:

    def get(self):
        pass

    def post(self):
        pass
user.py, login API
from flask import g

class User:

    def __init__(self, api):
        self.api = api

    def post(self, username, password):
        # query user from database
        g.token = {"id": user.id, "role": user.role}
        return user
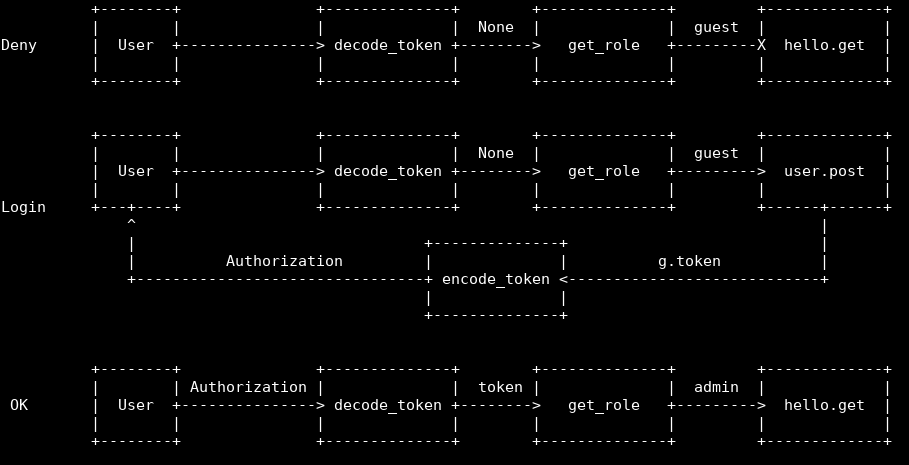
Context of Use
The user request hello.get firsthand, when framwork receive the request,
it will take token from Authorization headers,
token is None, then framwork call get_role(None), and gets guest ,
then see if get in meta["$roles"]["guest"]["hello"], the anwser is not,
so the framwork reject this request.
Then the user request user.post, the process is same as above,
the request arrive at user.post, then check username and password,
if success, set g.token which contains user ID, role, and expiration time.
TokenAuth will encode g.token by JWT, then send it to client through Authorization.
The user request hello.get again, and set request headers Authorization to
the token, the process is same as above, the request arrive at hello.get.
Diagram
Step by Step
1. Config roles in metafile
metafile is a file contains meta data of API, generally placed inside app's root path and filename is meta.json.
Api load metafile by Api(metafile="meta.json"):
{
    "$roles": {
        "Role": {
            "Resource": ["Action", ...]
        }
    }
}
When request arrived, the framwork can decide accept the request or not according to Role, Resource, Action rapidly.
Note
Flask's Development Server can't auto reload if metafile changed, so you should restart app manaually if modified metafile.
2. Register get_role function
Framwork can parse Resource, Action from URL, but it can't known which role the user is, so it needs you provide a function which can tell user's role.
3. Generate token
In order to identity users, the framwork should generate a token and send it
to client by response headers(Authorization).
The token will contains user ID and expiration time. The client should take token in request headers.
TokenAuth use json web token for Authorization.
Note
Token will be encode use app.secret_key, so it can't be tampered.
You should set app.secret_key before encode token.
Token is unencrypted, don't put sensitive information in it.
If authorization failed, the response is:
{
    "status": 403,
    "error": "PermissionDeny",
    "message": "xxx can't access xxxx"
}
Security and Configs
Different security requirements, authorize implementation will be different, TokenAuth implementations suitable for less demanding security applications.
When the token is about to expire, server will issue a new token to the client, so to avoid token expires cause interruptions of normal use by users.
But it can also lead to infinitely refreshed token which has some security risks.
Here is default configs:
{
    "$auth": {
          "algorithm": "HS256",     # token's encode algorithm
          "expiration": 3600,       # token's time to live, in seconds
          "header": "Authorization" # request/response header for token
          "cookie": null            # cookie name for token, default not use cookie
          "refresh": true           # auto refresh token or not
    }
}
Custom Auth
Api.authorize(role) can decide permit or reject request according to request
URL and $roles, you can simplify custom auth by utilize this method.
Here is the basic structure, see flask_restaction/auth.py for more:
class MyAuth:

    def __init__(self, api):
        self.api = api
        self.config = api.meta["$auth"]
        api.before_request(self.before_request)
        api.after_request(self.after_request)

    def before_request(self):
        """Parse request, check permission"""
        # parse role from request
        self.api.authorize(role)

    def after_request(self, rv, status, headers):
        """Modify response"""
        return rv, status, headers
API document
There are two ways to config route for API document.
Flask.route
app.route('/')(api.meta_view)
Api.add_resource
This way will treat document as a resource, and is easy for permission control.
# Note: enable token via cookie
{
    "$auth": {
          "cookie": "Authorization"
    }
}
# add_resource
api.add_resource(type('Docs', (), {'get': api.meta_view}))
Api.meta_view can also response API meta data in JSON format, set request
header Accept to application/json to do so.
Blueprint
Api can exist inside blueprint, then all resources will be routed in blueprint.
from flask import Flask, Blueprint
from flask_restaction import Api

app = Flask(__name__)
bp = Blueprint('api', __name__)
api = Api(bp)
api.add_resource(XXX)
app.register_blueprint(bp)
Note
add_resource should call before register_blueprint, otherwise add_resource has no effect.
Event handler
Api provide before_request, after_request, error_handler decorater for register event handlers.
@api.before_request
def before_request():
    # this function will be called before action exec
    # if return value is not None, then use it as response
    return response

@api.after_request
def after_request(rv, status, headers):
    # this function is used for process return value of action
    return rv, status, headers

@api.error_handler
def error_handler(ex):
    # handle exception raised from before_request and action
    # if return value is not None, then use it as response
    return response
Custom response format
The dafault response format is JSON, you can add custom response format easily.
from flask import make_response
from flask_restaction import exporter

@exporter('text/html')
def export_text(data, status, headers):
    return make_response(str(data), status, headers)
The framwork will choose appropriate response format according to the Accept value in request headers.
res.js
You can use res.js via open browser console in API document page.
If API's url prefix isn't '/', then you need config API_URL_PREFIX, for generating correct url in document and res.js.
Example: http://127.0.0.1:5000/api
app.config["API_URL_PREFIX"] = "/api"
See resjs for more infomation.
res.py
res.py's usage is similar as res.js, it use Requests for sending HTTP requests.
>>> from flask_restaction import Res
>>> help(Res)